Step-by-Step Preparation
Preparing the Cookie Base
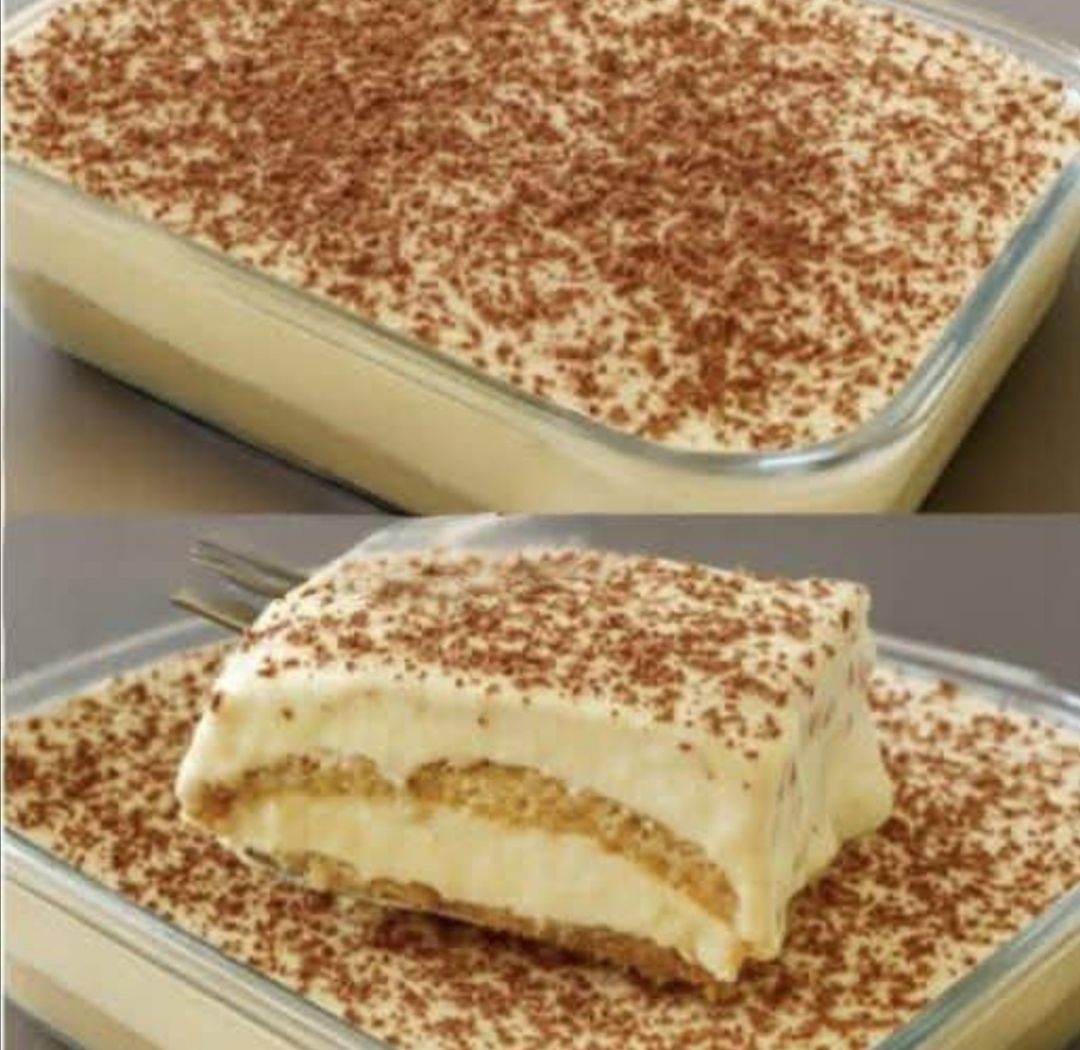
Begin with your cookie layer, as this forms the foundation of your dessert. You have two options here: you can either crush the cookies into fine crumbs and mix with melted butter to create a pressed crust, or you can arrange whole cookies in a single layer at the bottom of your dish.
For a crumb crust, pulse the cookies in a food processor until they become fine crumbs. Transfer to a bowl and mix thoroughly with the melted butter until the mixture resembles wet sand. Press this mixture firmly and evenly into the bottom of a 9×13 inch baking dish. Use the bottom of a measuring cup to ensure an even, compact layer.
For a whole cookie base, simply arrange the cookies in a tight, single layer covering the entire bottom of your dish. This method is quicker and creates distinct layers, though the cookies will soften as they absorb moisture from the cream filling.
Place your prepared base in the refrigerator while you make the cream filling.
Creating the Perfect Cream Filling
The cream filling is where the magic happens. This is a classic pastry cream, and while it requires some attention, it’s much easier than many people think.
In a medium saucepan, combine the milk and heavy cream. Heat over medium heat until it just begins to simmer around the edges. Do not let it boil. Remove from heat.
While the milk mixture is heating, whisk together the egg yolks, sugar, and flour in a separate bowl until smooth and well combined. The mixture should be thick and pale yellow.
Now comes the crucial step: tempering. This prevents the eggs from scrambling when they meet the hot liquid. Slowly pour about half a cup of the hot milk mixture into the egg mixture while whisking constantly. Continue adding the hot milk gradually, whisking all the time, until about half the milk has been incorporated.
Pour this tempered egg mixture back into the saucepan with the remaining milk. Return to medium-low heat and cook, whisking constantly, until the mixture thickens considerably. This usually takes 5-7 minutes. You’ll know it’s ready when it coats the back of a spoon and you can draw a line through it with your finger that doesn’t immediately fill in.
Remove from heat and stir in the butter and vanilla extract until the butter melts completely and everything is smooth and glossy. Let this cool for about 10 minutes, stirring occasionally to prevent a skin from forming.
Pour the cream filling over your cookie base, spreading it evenly to all corners. Gently tap the dish on the counter a few times to release any air bubbles. Cover the surface directly with plastic wrap to prevent a skin from forming, and refrigerate for at least 3 hours, or until completely set.
Whipping Up the Perfect Topping
Once your cream filling has set completely, it’s time for the final layer. Remove your dessert from the refrigerator and take off the plastic wrap.
In a large, cold bowl (chilling your bowl and beaters for 15 minutes beforehand helps), combine the heavy whipping cream, powdered sugar, and vanilla extract. Beat with an electric mixer on medium-high speed until stiff peaks form. Be careful not to over-beat, or you’ll end up with butter.
Spread the whipped cream evenly over the set cream layer, creating swirls and peaks for visual interest. Some people prefer a smooth, elegant finish, while others love the rustic look of textured whipped cream – choose whatever appeals to you.
Dust the top generously with cocoa powder using a fine-mesh sieve. This not only looks beautiful but adds a subtle chocolate flavor that complements the vanilla cream perfectly. For extra flair, you can also add chocolate shavings or grated chocolate.
Cover loosely and refrigerate for at least 2 more hours before serving, though overnight is even better.
Tips for Perfect Results Every Time
Temperature Matters – Keep all your dairy products cold until you’re ready to use them, especially for the whipped cream topping. Cold cream whips better and holds its shape longer.
Don’t Rush the Cooling – Allow the cream filling to cool for a few minutes before pouring it over the cookies, but don’t let it cool completely or it may start to set. You want it warm enough to spread easily but cool enough not to melt any whipped cream or soften the base too much.
Patience Pays Off – While it’s tempting to dig in as soon as you finish assembling, this dessert truly needs those several hours (or overnight) in the refrigerator. This allows the layers to set properly and the cookies to soften to the perfect texture.
Smooth Cream Filling – If lumps form in your cream filling, don’t panic. Simply strain it through a fine-mesh sieve before pouring over the base. This ensures a silky-smooth texture.
Clean Cuts – For picture-perfect slices, dip your knife in hot water, wipe it dry, and then cut. Clean and re-dip the knife between each cut.
Delicious Variations to Try
Chocolate Lover’s Version
Replace half the vanilla extract in the cream filling with cocoa powder. Mix 1/4 cup cocoa powder with the flour before whisking into the eggs. Top with chocolate shavings instead of just cocoa dust.
Coffee-Infused Delight
Add 2 tablespoons of instant espresso powder to the milk when heating. The coffee flavor pairs wonderfully with the vanilla and creates a sophisticated tiramisu-inspired dessert.
Berry Bliss
Layer fresh or frozen berries (strawberries, raspberries, or blueberries) over the cream filling before adding the whipped topping. The fruit adds freshness and a pop of color.
Banana Cream Dream
Slice 3-4 ripe bananas and layer them over the cookie base before adding the cream filling. This transforms the dessert into a banana cream pie experience.
Coconut Paradise
Add 1/2 cup of coconut cream to the cream filling and fold 1 cup of toasted coconut flakes into the whipped topping. Toast additional coconut to sprinkle on top instead of cocoa powder.
Lemon Sunshine
Replace the vanilla in the cream filling with lemon zest and 2 tablespoons of fresh lemon juice. This creates a bright, refreshing dessert perfect for summer.
Serving Suggestions
This dessert is beautiful on its own, but you can elevate the presentation with a few simple touches. Serve each slice with a few fresh berries on the side, or drizzle with chocolate or caramel sauce for added decadence.
For an elegant dinner party, pipe a rosette of extra whipped cream on each slice and top with a chocolate curl or a fresh mint leaf. The dessert can be plated individually in the kitchen for a more formal presentation, or served family-style at the table.
Coffee or espresso is the perfect beverage pairing, as the slight bitterness balances the sweetness of the dessert. A dessert wine or sweet liqueur also complements the creamy richness beautifully.
Storage and Make-Ahead Tips
One of the best features of this dessert is how well it stores and how perfect it is for making ahead. In fact, it needs to be made ahead, which takes the pressure off when you’re entertaining.
The dessert will keep well in the refrigerator, covered, for up to 3 days. The cookies will continue to soften as time passes, eventually becoming cake-like in texture, which many people actually prefer.
If you’re making this for a party, prepare it the night before. This gives all the layers time to meld together and allows the cookies to reach that perfect soft texture that makes cutting and serving so much easier.
While this dessert doesn’t freeze well due to the whipped cream topping, you can freeze just the cookie base and cream filling for up to 1 month. Thaw in the refrigerator overnight and add the fresh whipped cream topping before serving.
Troubleshooting Common Issues
Runny Cream Filling – If your cream filling doesn’t set properly, it likely wasn’t cooked long enough. The mixture needs to reach a full boil and thicken considerably before removing from heat. Next time, cook it a minute or two longer.
Lumpy Cream – Lumps form when the eggs cook too quickly or when the mixture isn’t whisked constantly. The tempering step is crucial. Always strain if lumps form.
Watery Topping – If liquid pools under your whipped cream, your cream was either over-beaten or not beaten cold enough. Make sure your bowl and beaters are very cold and stop beating as soon as stiff peaks form.
Soggy Base – If your cookie base becomes too soggy, you may have poured the cream filling on while it was still too hot. Let it cool for 10-15 minutes first.
Why This Dessert Is Perfect for Any Occasion
The versatility of this dessert makes it suitable for virtually any occasion. Its elegant appearance makes it appropriate for formal dinners, while its familiar, comforting flavors make it perfect for casual family gatherings.
It’s an excellent choice for potlucks because it travels well and feeds a crowd. The 9×13 pan yields 12-15 generous servings, and you can easily double the recipe for larger groups.
During hot summer months, this cool, creamy dessert is incredibly refreshing without being too heavy. In winter, it offers a lighter alternative to dense holiday cakes while still feeling indulgent and special.
For novice cooks, this recipe builds confidence. The straightforward steps and forgiving nature mean that even if things don’t go perfectly, the end result is still delicious. It’s an excellent recipe for teaching children or teenagers about cooking, as it involves several basic techniques without being overly complicated.
The Joy of Homemade Desserts
In a world of store-bought convenience foods, there’s something deeply satisfying about creating a beautiful dessert from scratch. This no-bake cream dessert proves that homemade doesn’t have to mean difficult or time-consuming.
When you serve this dessert, you’re offering more than just a sweet treat. You’re sharing something you made with your own hands, something that required your time and attention. That personal touch transforms a simple dessert into something memorable.
The reactions you’ll get when you bring this to the table make every minute of preparation worthwhile. The perfect layers, the generous portions, and most importantly, the incredible taste will have everyone asking for the recipe.
So next time you need a dessert that impresses without stress, that can be made ahead without worry, and that everyone will love, reach for this recipe. It’s about to become your signature dessert – the one people request by name and remember long after the last bite is gone.
Gather your ingredients, clear some space in your refrigerator, and prepare to create something truly special. Your new favorite dessert awaits.

